I. The App’s HDR Calculation Function
II. The App’s Noise Reduction via Downsampling function
III. The App’s Multi-Pass Image Upsampling function
It has been said that before a great artist can be a master of his craft, he must first be a master of his tools. That simple premise forms the bedrock of the Camera Toolkit, a new iOS iphone application for photographers. Designed and programmed from the ground up by a professional landscape photographer (myself) for other photographers, this app performs three functions: it (1) calculates the HDR exposure difference between two shots in a HDR bracket, (2) performs noise reduction calculations, and (3) determines the number of passes necessary to upsample an image in multi-pass up sampling, all common techniques that are the mainstay of many an amateur and professional photographer’s workflow.
I. The App’s HDR Calculation Function
a. Background
High Dynamic Range (HDR) Photography is becoming increasingly popular. Exposure bracketing, a technique frequently employed by the HDR Photographer, involves varying the shutter speed (and less commonly, aperture and ISO) in successive exposures of the same scene. Exposure differences are commonly measured in stops: one exposure is said to be one stop greater than another if it gathers twice as much light. Of the three parameters that the photographer may vary to control the light acquisition of the exposure, shutter speed is perhaps the easiest to understand.
b. Shutter Speed
Shutter speed refers to the duration the camera’s shutter is raised, exposing the sensor behind it to light from the scene. It is commonly measured in fractions of a second such as a 1/60th sec, 1/250th sec, and less commonly in seconds (eg. 2 sec) and hours. A shutter speed of five seconds is one stop less than a shutter speed of ten seconds. This result is intuitive–one would expect that if a camera’s shutter is open for twice as long, it will gather double the amount of light. By extrapolating this line of reasoning, we can rightly conclude that a shutter speed of 20 seconds is one stop greater than one of 10 seconds and two stops greater than a shutter speed of 5 seconds.
c. ISO
Apart from the shutter speed, another parameter the photographer may vary to affect the light-gathering ability of the camera is the ISO setting. Typical ISO values, each a stop greater than the previous one are as follows: 50, 100, 200, 400, 800, 1600, 3200, 6400, 12800, 25600, 52,200, 102,400, and 204,800. Thus, an ISO value of 200 is said to be one stop greater than an ISO value of 100, and an ISO of 800 is likewise two stops less than an ISO of 3200. Note that the ISO scale is not linear, but rather exponential.
d. Aperture
Lastly, aperture values or f-stops are also arranged on an exponential scale. A typical sequence of relative apertures (also known as f-numbers or f-stops) in which each subsequent value gathers one stop less light than the previous one is as follows: f/1, f/1.4, f/2, f/2.8, f/4, f/5.6, f/8, f/11, f/16, f/22, f/32, etc. f/1 gathers twice as much light as f/1.4 and four times as much light as f/2.0. However, unlike with shutter speed and ISO, varying the aperture also affects the depth of field of the image–the higher the f-number, the greater the depth of field.
e. Using the iOS application

Depending interplay of light and shadow in the scene that presents itself to the photographer, he or she may bracket a scene differently. Many cameras allow the photographer to vary the exposure bracketed by +/- 0.5EV, 1.0EV, 2.0EV. In addition, canon cameras equipped with CHDK have at their disposal +/- ⅔ EV, 1 ⅓ EV, 2 ⅔ EV, 3 ⅓ EV etc. A value greater than +/- 3 E.V. is especially useful when shooting “contre-jour” (into the sun). This program is especially useful because it calculates the difference in exposure values (E.V. or stops) between two such captures, even if the ISO, aperture, and shutter speeds wildly differ between exposures. This value may then be utilized at the start of the HDR workflow to either verify or supplant that calculated by HDR programs including but not limited to Photomatix and HDR Efex Pro. Consider the screenshot of the actual app’s interface above, in which the EV Calculation tab has been selected. Here ISO, Aperture, and Shutter Speed values can be entered for two different exposures, namely Exposure 1 and Exposure 2. In the example here, for the first exposure, ISO = 50, Aperture is f/1.4, and shutter speed is 1/30 second, while the corresponding values for the second exposure are ISO = 400, Aperture is 5.6, Shutter speed is 1/120 second. After we input these values, we then press the “Calculate E.V” button, which calculates and displays in green the number of stops by which the first exposure differs from the second (3 stops in this particular case). A restatement of this would be that exposure 1 is eight times brighter than exposure 2. If the output is a negative number, this indicates that Exposure 1 is darker than Exposure 2.
II. The App’s Noise Reduction via Downsampling function
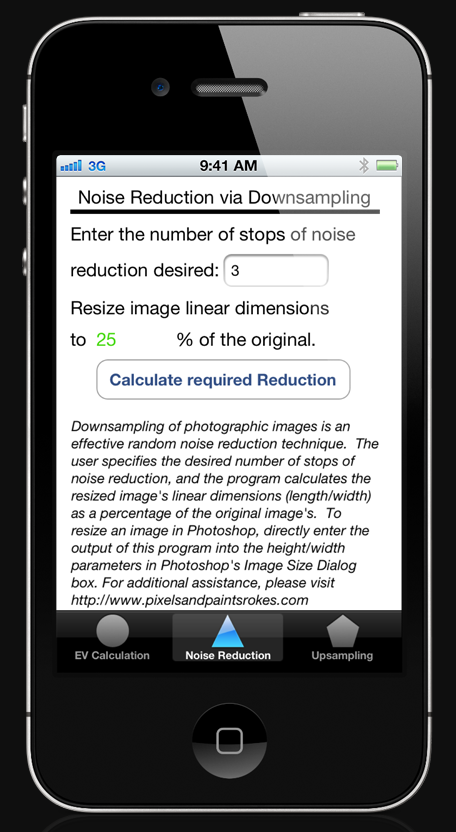
Separately, in another tab, this application can also calculate the extent to which a particular image needs to be resized (downsampled) in order to reduce the amount of random photographic noise by a user-specified number of stops. Photographic random noise is consequent either to the use of higher ISOs or to a rise in sensor temperature (from extended photography in hot environments). With the proliferation of such high-megapixel cameras as the Nikon D800, Nikon D3200, Canon 5DMKIII, NEX 5/7 etc., it is becoming increasingly feasible for one to capture high ISO action-stopping images in low-light environments and then downsample the image in post-production to mitigate apparent noise. That’s where this feature comes in. All you need to do is specify the desired number of stops of noise reduction, and the program calculates the resized image’s linear dimensions (length/width) as a percentage of the original image’s. What does this mean? Well, consider the 100% crop below.
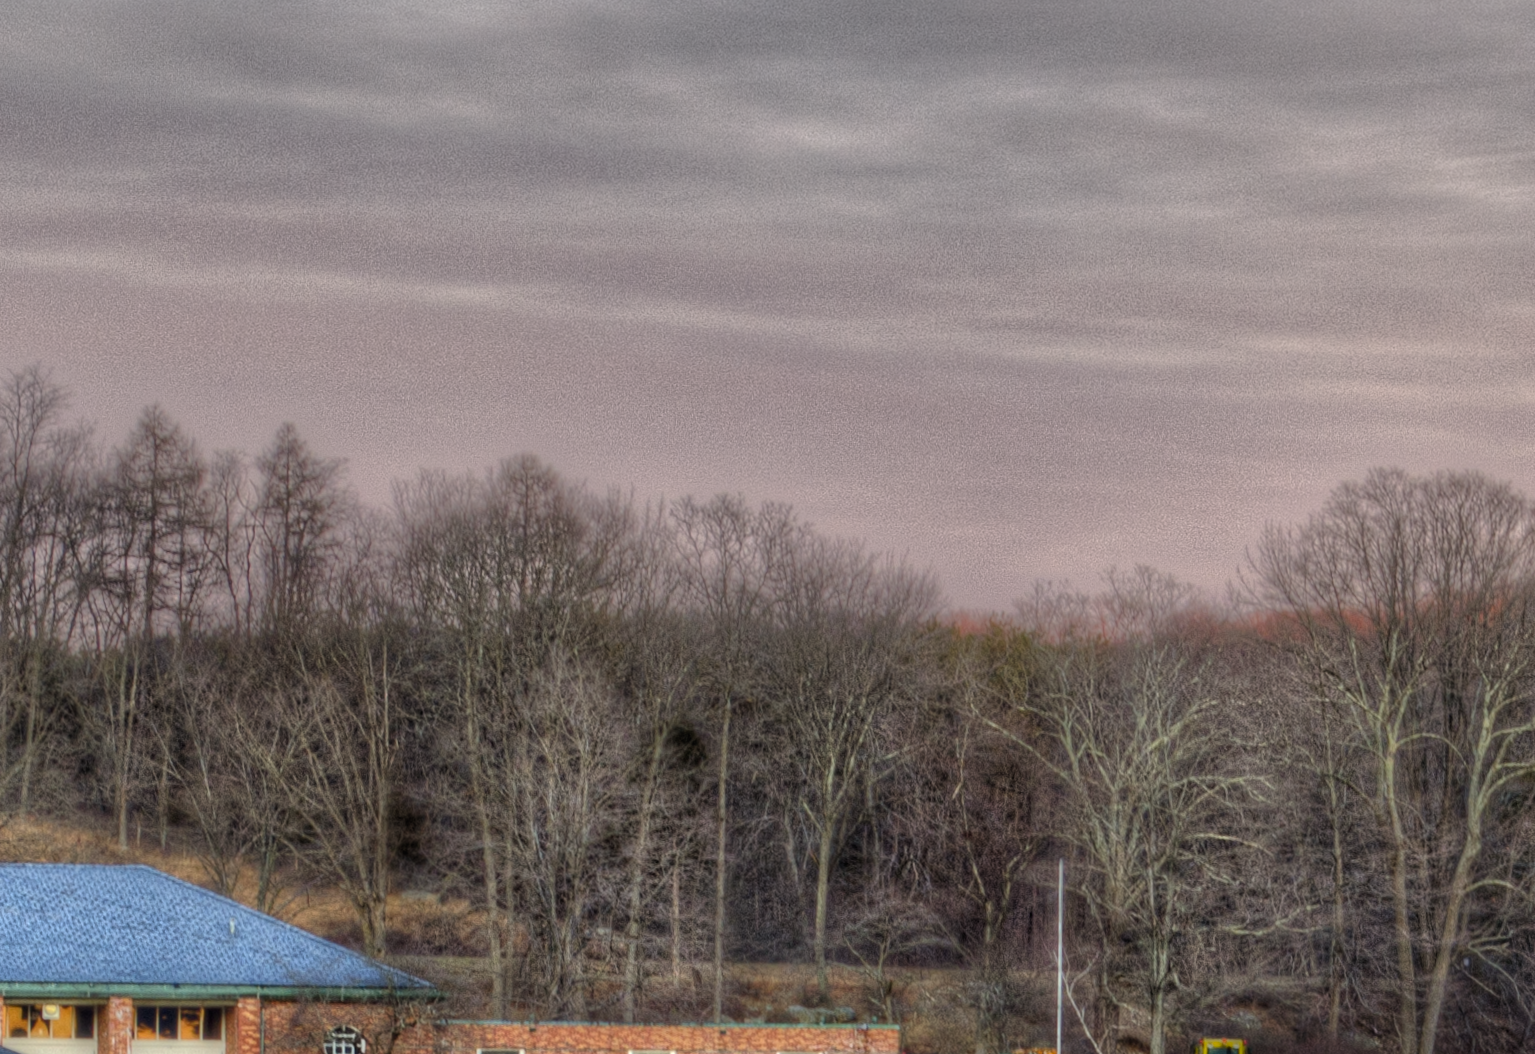
We can see significant luminance noise in the sky. I would like to reduce this noise by three stops. To do so we enter a value of “3” for the stops of noise reduction desired and then press “Calculate required Reduction.” The app calculates that the image’s linear dimensions i.e. its length and width be resized to 25% (one-fourth) of their original values. In other words, if the image was originally 240 pixels wide by 320 pixels high, the new, downsampled image will be 60 pixels wide by 80 pixels high. Note that even though the image’s linear dimensions decreased by a quarter, its area (and the number of megapixels) decreased eightfold. To effect such a change, open the image in an image-editing program of your choice (I will be using Photoshop to demonstrate) and navigate to Edit -> Image ->Resize Image. The Image Size dialog box is presented to you, as shown in
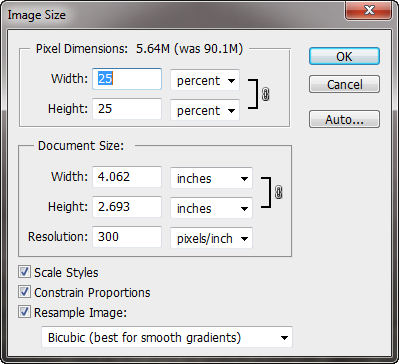
Here, change the drop-down menus next to height and width from “Pixels” to “Percent” and simply enter “25%” into either the width or height fields. Make sure all the other statements such as “Resample Image” etc are checked as depicted and then click “Ok.” The following image is the result.
Notice that not only is the image sharper, but the luminance noise that peppered the sky has vanished.
III. The App’s Multi-Pass Image Upsampling function
To those of you who routinely upsample your images (perhaps to display in a gallery or on a billboard), the Multi-Pass Upsampling calculator of program will prove especially useful. It can calculate the number of passes necessary to enlarge an image in small, arbitrary, user-specified increments until the final enlarged size is attained. Upsizing an image in multiple, iterative steps rather than a single one yields higher micro-contrast and greater detail than would be accomplished through more traditional means such as single-pass bicubic upsampling. In fact, the results of this technique are almost on par with those achieved by resizing using fractal resizing, a method employed by a specialized program such as Genuine Fractals.
An example
To wit, assume that we had at our disposal the following image, which we desire to enlarge 400%.

Note that this image was derived from a high-resolution 16 MP image whose linear dimensions were shrunk to 25% of their original value. We are going to upsample this “shrunk” image’s dimensions to 400% of their shrunk values so that their size will be identical to the original images. To determine the comparative efficacy of the technique, two resampling techniques will be used–single pass bicubic upsampling and multipass upsampling. On the iOS app, we enter 400 into the “% total enlargement desired” box, as shown below.
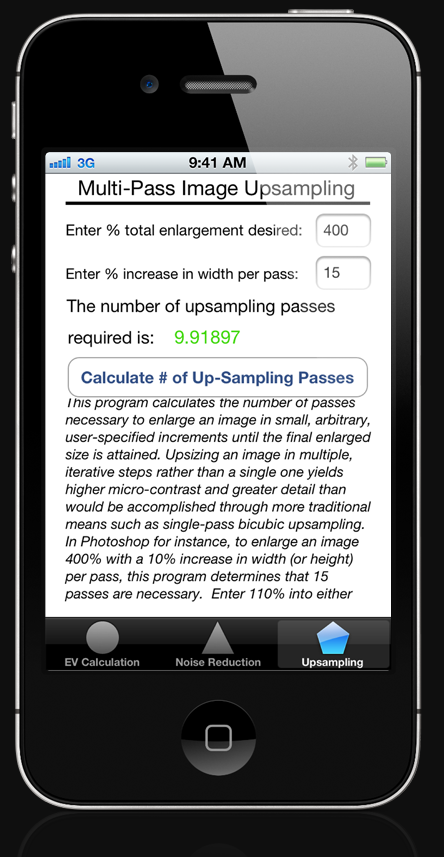
Next, we decide to increase the width by only 15% per iteration (if the image had an original width of 1.00, after one pass, it would have a width of 1.15). So we enter a value of 15 into the “%increase in width per pass” box. Next, press the “Calculate # of Up-Sampling Passes” button. The program states in green that we need at least 10 passes to achieve 400% enlargement. Equipped with this information, we head over to an image editing program of your choice. Here, I demonstrate the workflow involved using Photoshop.
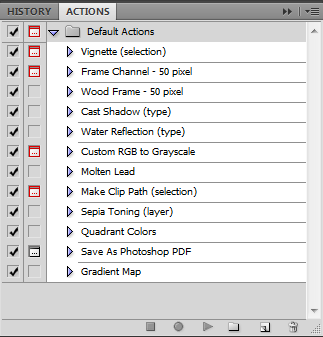
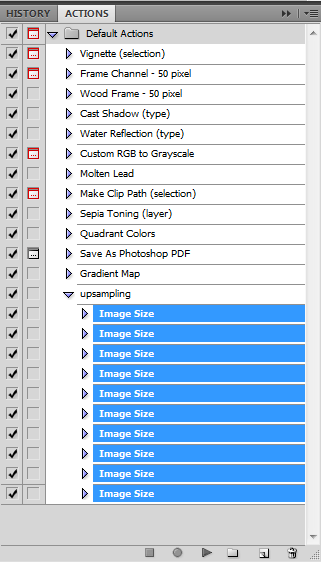
First open any image in Photoshop other than the one you wish to resize. Next, navigate to Window->Actions. This will toggle to “Actions” window, as depicted below.
Notice the row of small, unassuming buttons at the base of this window. Click on the second-to-last one from the right. This brings up the “New Action” dialog box depicted below.
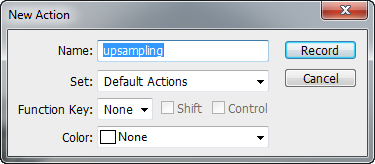
Rename this action to a name of your choosing (in this example, I use “upsampling” for a name). Press the “Record” button, which is the circular button located second from the left. It glows red. Next, navigate to Edit->Image->Image Resize. In the subsequent Image Resize dialog box, depicted below, change the drop-down box to the right of “width” from “pixels” to “percent” and then enter a value of 115% for the width (you are instructing Photoshop to increase the image’s width to 115% of its original size, which is equivalent to stating “increase the image’s width by 15%”). Now, press the stop button in the “Actions window” (the first one from the left, morphologically akin to a square). Then, within your upsampling action, select the “Image Size” line as shown.
![]()
Next, at the upper right of the actions window, notice a small drop-down arrow with horizontal lines next to it. Click this button and then choose “duplicate action,” as shown below.
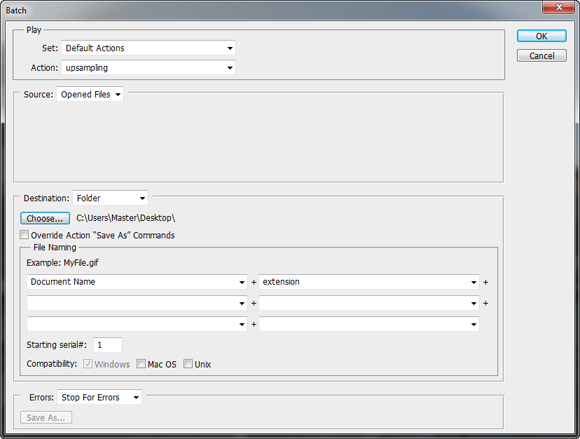
Now, close this dummy image you were working on. Then, open the actual image you wish to enlarge by 400%. Next, navigate to File->Automate->Batch. This presents you with the “Batch” window, as depicted below.
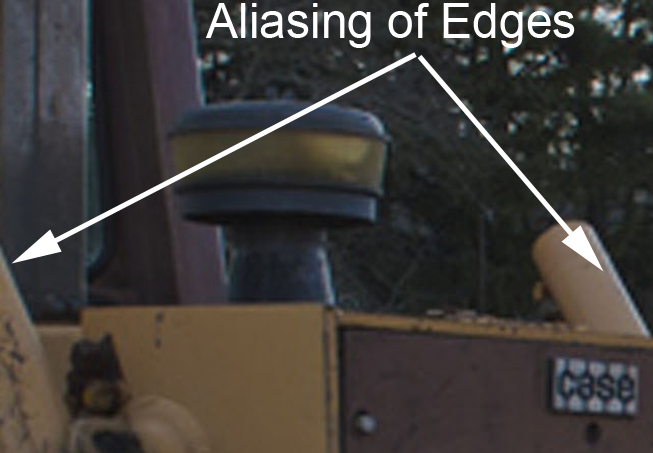
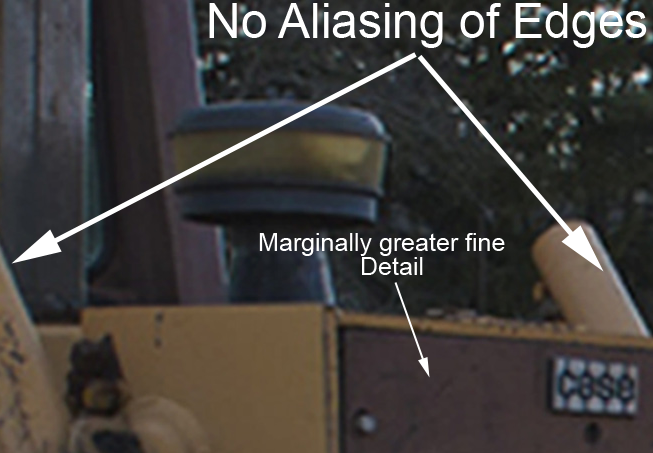
The results of the multipass upsampling are shown below. Mouse over the image to compare it to the results that would have been acquired had we performed only a single upsampling pass. The differences are subtle, but they are present: the multi-pass version has greater detail and no aliasing, whereas the single pass bicubic upsampling has not only lost fine detail, but also introduced aliasing artifacts.
To elucidate the subtle differences between these two upsampling algorithms, these two images were opened as separate layers in Photoshop. After setting the Layer blend mode of the top image to “subtraction,” and boosting levels to reveal the difference, the result is as follows. Now, we can clearly see that the areas where the images most differ is at the edges, which not coincidentally are more artifacted in the single pass upsample.
Finally, the 100% crop of the original high resolution image is shown, indicating that no matter how good our upsampling technique may be, there is no substitute for an original high resolution image!
Conclusion
It is my hope that this application be of service to you on your journey through photography. Should you have any questions regarding its functionality, do drop me a line. All my best.
David Pereira.
“ Which of my photographs is my favorite? The one I’m going to take tomorrow. – Imogen Cunningham